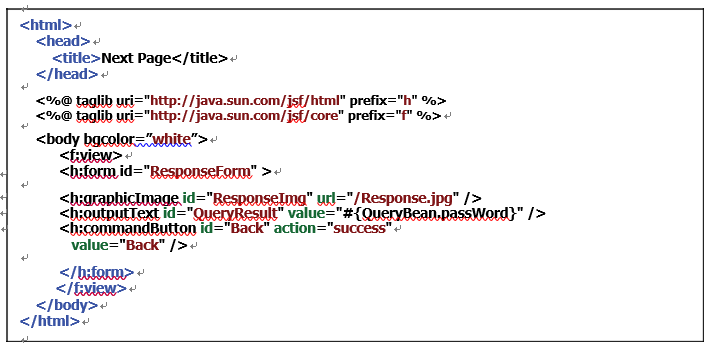
An interesting thing in step E in this piece of sample code is that an embedded backing bean property, userName, has been bound to the value attribute of the inputText tag. Recall that we used either the getAttribute() method of a JSP implicit object session (session.getAt-tribute()) or the getProperty() method of a Java bean to hook to the value attribute of this text field tag in the previous sample code to enable this text field’s value to be updated automatically. However, in this JSF file, we directly bind one of the backing bean’s properties, userName, with the value attribute of this text field by using the value-binding expression in the expression language (EL) with the syntax #{bean-managed-property} to update the data. One point to be noted is that the JSF EL bindings are bi-directional when it makes sense. For example, the UI component represented by the inputText tag can get the value of the bean property userName and present it to the user as a default value. When the user submits the QueryForm data, the UI component can automatically update the bean property userName so that the application logic can process the new value. You can see how easy it is now to setup a connection between a component in a JSF page and the related property in the backing bean object when using this binding for a JSF file. In fact, you can bind not only the bean’s properties but also the bean’s methods to certain UI components in JSP pages. The code for the Next.jsp file is shown in Figure 8.26. The detailed function of this piece of
code is:
A. The form id is defined as a Response Form.
B. An image is added into this page with the image id and the image URL. The forward slash, “/”, before the image name, Response.jpg, indicates that this image is located in the current project folder.
C. An outputText tag is equivalent to a label in a Web page. The selected password is assigned to the value attribute using a value-binding expressions with the syntax

#{bean-managed-property}. In fact, this value is bound with a property password in the backing bean QueryBean class.
D. The command Button Back is used to direct the page to return to the Current.jsp page when it is clicked by the user. This return function has been defined in the application configuration source file, faces-config.xml, we discussed previously.
The real tracking issue is no username-password matching process occurs in either of these two pages. Yes, that is true! All of the data-matching processes, or, as we called them business logic, occur in the backing Java bean QueryBean class.
When user enters a valid username into the input textbox and clicks the Submit button in the Current.jsp page, all input data is sent to the next page, Next.jsp. Of course, you can handle the data matching on the Next.jsp page based on the passed username. However, in order to separate the presentation from business logic, JSF uses JSF pages as views and assigns the business logic to the Java beans that work as controllers to handle the data-matching jobs. In fact, since the userName has been bound to the value attribute of the input Text tag by using a value-binding expression with the syntax #{bean-managed-property}, any change to this data item will be immediately reflected to the associated property, userName, defined in the Java bean QueryBean class. The Java bean will perform the password-matching process based on that username and send the matching password to the passWord property in that bean class. As soon as the Java bean fin-ishes the password-matching processing and sends the matching password to the passWord prop-erty, it can be immediately updated and displayed in the output Text QueryResult in the Next. jsp page using the value-binding expression#{QueryBean.passWord}.
